Unlocking Grandma's Secrets: Perfecting Pumpkin Pie

There's something magical about the flavours of grandma's baking, especially when it comes to classic holiday desserts like pumpkin pie. If you've ever wondered how to recreate that perfect pumpkin pie from your childhood, you're in the right place. We’ve asked our staff’s grandmas to provide their tips and tricks and created the ultimate guide to baking the best pumpkin pie.
We’ve also included cooking and baking tips and essential tools to help you along the way!
Grandma's Tips and Tricks
- Start with a homemade pie crust. While store-bought crusts are convenient, nothing beats the flakiness of a homemade one. Let’s face it: Grandma made her crusts from scratch – so don’t skip this step or skimp on the butter!
- Make sure you use cold butter or shortening, ice water, and a light touch when mixing to achieve that perfect texture.
- Look for sugar pumpkins (also known as pie pumpkins) for the puree. They're sweeter and smoother in texture compared to carving pumpkins.
- Although you can buy canned puree, there’s something special about carving and roasting the pumpkin from scratch. We’ve been told to roast the pumpkin rather than boiling it. This intensifies the flavor by reducing its moisture content. Cut the pumpkin in half, scoop out the seeds, and roast at 350°F (175°C) until tender, usually around 45 minutes to an hour. Then, scoop out the flesh and puree it.
- Use a balanced blend of spices, including cinnamon, nutmeg, cloves, and a pinch of ginger. Freshly grated nutmeg adds exceptional flavor, but every grandma has her go-to combination!
- Mix your ingredients gradually to prevent overmixing, which can result in a dense pie. Combine dry ingredients first and then add the wet ones slowly.
- To prevent a soggy bottom crust, consider blind baking. Line the crust with parchment paper and fill with pie weights or dried beans. Bake for a short time before adding the filling.
- Last but certainly not least, don't underestimate the importance of love and patience. Baking a pumpkin pie is a labor of love. Take your time to create a beautiful crust, ensure your ingredients are well combined, and bake with care.
Now that you have the tips, here are some of the right tools to get you started!
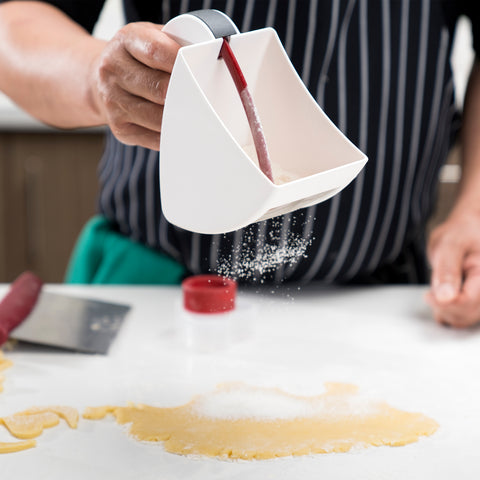
Cuisipro Flour Sifter
Sifting flour with a sifter is essential for achieving a light and airy texture in your pie crust. It aerates the flour, breaking up any clumps and ensuring an even distribution of moisture. This results in a smoother and more delicate pastry that's less likely to be tough or dense.
Cuisipro Deluxe Pastry Blender
This is a valuable tool for creating a flaky and tender pie crust. It allows you to effortlessly cut cold butter into the flour mixture. By maintaining cold butter pieces throughout the dough, the pie crust bakes up with distinct layers, resulting in that sought-after flakiness.

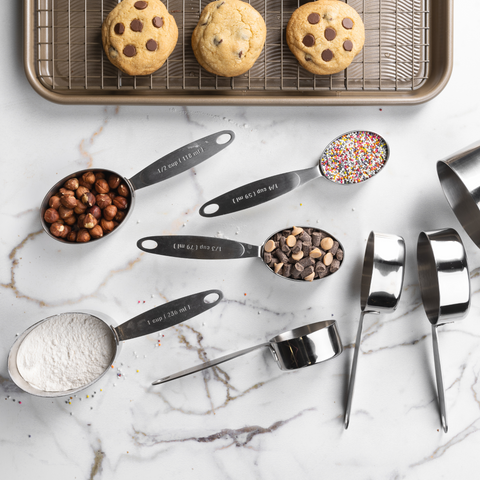
Cuisipro Measuring Spoons and Cups
Precision in baking is crucial, and when you measure your ingredients precisely, you maintain the correct balance of dry and wet components in your pie, resulting in a well-textured filling and crust. Inconsistencies in measurements can lead to undesirable changes in texture and taste. These measuring tools help you achieve the perfect balance of flavours and textures in your pie.
Grandmas Pumpkin Pie
Let's plunge into the recipe and craft a flawless pie that will truly tantalize your taste buds. Prepare to roll up your sleeves, infuse your creation with love, and transform those expert tips and quality tools into a delectable masterpiece!

Ingredients for Crust:
- 1 ¼ cups all-purpose flour
- ½ teaspoon salt
- 1 tablespoon granulated sugar
- ½ cup (1 stick) cold unsalted butter, cubed
- 3-4 tablespoons ice water
Ingredients for Filling:
- 1 ½ cups pumpkin puree (homemade or canned)
- 3/4 cup granulated sugar
- 1 tsp ground cinnamon
- 1/2 tsp ground nutmeg
- 1/4 tsp ground cloves
- 1/2 tsp salt
- 2 large eggs
- 1 cup evaporated milk
Instructions for Crust:
- Place the butter in the freezer for about 15 minutes before using. This ensures the butter stays cold, resulting in a flaky crust.
- Meanwhile, in your Cuisipro Mixing Bowl, whisk together the flour, salt, and sugar until well combined.
- Using your Cuisipro Grater, grate the cold butter into the dry ingredients. Using the Cuisipro Deluxe Pastry Blender work the butter into the flour mixture until it resembles coarse crumbs. This should take a few minutes.
- Gradually add ice water, one tablespoon at a time, while gently mixing with a fork. Stop adding water when the dough begins to come together. It's crucial not to overwork the dough.
- Turn the dough out onto a lightly floured surface and gently shape it into a disk. Wrap it in plastic wrap and refrigerate for at least 30 minutes (or longer if possible). Chilling the dough allows it to rest and makes it easier to roll out.
- Preheat your oven to 425°F (220°C). Roll out the chilled dough on a floured surface into a circle that's slightly larger than your pie pan. Carefully transfer the dough to the pie pan, press it into place, and trim any excess dough.
- For a crisp crust, you can blind bake it. Line the crust with parchment paper and fill with pie weights or dried beans. Bake for 15 minutes in the preheated oven. This helps prevent a soggy bottom crust.
Instructions for Filling:
- While your pie crust is baking, combine the pumpkin puree, granulated sugar, cinnamon, nutmeg, cloves, and salt in your Cuisipro Mixing Bowl. Mix until well combined.
- Beat the eggs and add them to the pumpkin mixture. Stir until thoroughly combined.
- Slowly pour in the evaporated milk while stirring continuously. This step ensures a creamy and smooth consistency.
- Pour the prepared pumpkin filling into the pie crust, ensuring it's evenly distributed.
- Place the pie in the preheated oven for 15 minutes. Then, reduce the temperature to 350°F (175°C) and bake for an additional 40-50 minutes or until the pie is set, and a toothpick inserted into the centre comes out clean.
- Allow your pumpkin pie to cool on a Cuisipro Cooling Rack for at least two hours before serving. This step ensures your pie sets properly and is ready to enjoy.
We invite you to share your experiences with us. Use the hashtag #Cuisipro to connect with our baking community and showcase your delectable creations. Whether you’re a pie-baking novice or you're a seasoned pie expert, we'd love to hear about your baking journey!